Difference between revisions of "Solum/solum m2 demo"
Adrian Otto (talk | contribs) |
(→Set Up Your Own Development Environment) |
||
| (6 intermediate revisions by the same user not shown) | |||
| Line 1: | Line 1: | ||
| + | === Set Up Your Own Development Environment === | ||
| + | You can set up your own demo environment to run your own installation of Solum with Devstack in a vagrant box. This uses VirtualBox as the default provider, so it will work on a Mac or PC with Vagrant and VirtualBox loaded. This has been tested with the latest versions of Vagrant and VirtualBox. | ||
| + | |||
| + | Ideally, following steps should be sufficient: | ||
| + | |||
| + | 1) Clone the vagrant repo: git clone https://github.com/rackerlabs/vagrant-solum-dev | ||
| + | |||
| + | 2) Clone solum and python-solumclient repositories | ||
| + | git clone https://github.com/openstack/solum.git | ||
| + | git clone https://github.com/openstack/python-solumclient.git | ||
| + | |||
| + | 3) Set SOLUM and SOLUMCLIENT environment variables | ||
| + | SOLUM=<path on Host system to solum repo> | ||
| + | SOLUMCLIENT=<path on Host system to python-solumclient repo> | ||
| + | |||
| + | 4) Start the vagrant VM: vagrant up --provision | ||
| + | |||
| + | 5) Enter the vagrant VM: vagrant ssh | ||
| + | |||
| + | After this you can follow the steps from the getting_started guide (http://docs.openstack.org/developer/solum/getting_started/) | ||
| + | |||
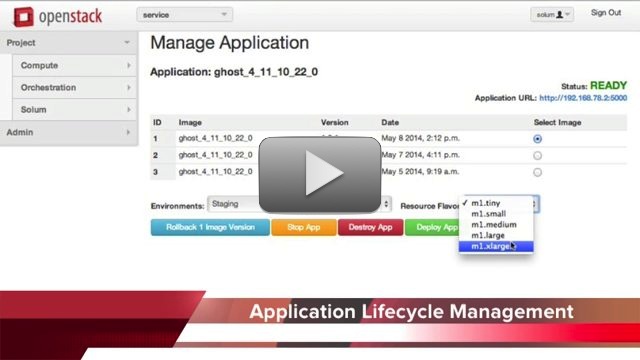
== Solum Demo == | == Solum Demo == | ||
| − | === Video === | + | === Atlanta Demo Video === |
<center> | <center> | ||
[[File:Solum_Demo_Thumbnail.jpg|none|link=https://vimeo.com/94905913|frame|]] | [[File:Solum_Demo_Thumbnail.jpg|none|link=https://vimeo.com/94905913|frame|]] | ||
</center> | </center> | ||
| − | === | + | |
| − | + | === Vancouver Demo Video === | |
| + | |||
| + | https://vimeo.com/126307313 | ||
__TOC__ | __TOC__ | ||
| − | === Solum Demo Vagrant Installation Instructions === | + | === Solum Demo Vagrant Installation Instructions (Old) === |
''These installation instructions were tested on Mac OSX v10.7.5 and OSX 10.8.5'' | ''These installation instructions were tested on Mac OSX v10.7.5 and OSX 10.8.5'' | ||
Latest revision as of 09:07, 13 December 2015
Set Up Your Own Development Environment
You can set up your own demo environment to run your own installation of Solum with Devstack in a vagrant box. This uses VirtualBox as the default provider, so it will work on a Mac or PC with Vagrant and VirtualBox loaded. This has been tested with the latest versions of Vagrant and VirtualBox.
Ideally, following steps should be sufficient:
1) Clone the vagrant repo: git clone https://github.com/rackerlabs/vagrant-solum-dev
2) Clone solum and python-solumclient repositories
   git clone https://github.com/openstack/solum.git
   git clone https://github.com/openstack/python-solumclient.git
3) Set SOLUM and SOLUMCLIENT environment variables
   SOLUM=<path on Host system to solum repo>
   SOLUMCLIENT=<path on Host system to python-solumclient repo>
4) Start the vagrant VM: vagrant up --provision
5) Enter the vagrant VM: vagrant ssh
After this you can follow the steps from the getting_started guide (http://docs.openstack.org/developer/solum/getting_started/)
Solum Demo
Atlanta Demo Video
Vancouver Demo Video
Contents
Solum Demo Vagrant Installation Instructions (Old)
These installation instructions were tested on Mac OSX v10.7.5 and OSX 10.8.5
1. Install Vagrant (http://www.vagrantup.com/downloads.html). Tested with Vagrant v1.5.4
2. Make a directory for the two repositories, and activate the demo UI. This demo uses the ~/Solum_Demo directory.
mkdir ~/Solum-Demo
cd ~/Solum-Demo
git clone https://github.com/rackerlabs/vagrant-solum-dev.git vagrant
git clone https://github.com/rackerlabs/solum-m2demo-ui.git m2demo
export WEBGUI=`pwd`/m2demo
export USE_SOLUM_UI=True
For those who prefer to use VMs instead of Docker containers (the default).
export SOLUM_IMAGE_FORMAT=vm # Add only if you don't want Docker containers
3. Create the demo environment on your system:
cd vagrant
vagrant up
NOTE: This may take between about 15 and 60 minutes to install, depending on the speed of your machine and network.
4. Add a route so the demo app can be seen from your host machine:
sudo route add -net 192.168.78.0/24 192.168.76.2
5. Browse to this URL to see the demo: (http://192.168.76.2:9001/solum/)
Common Vagrant Commands
- vagrant halt --- Stops the running vagrant but doesn't delete anything
- vagrant up --provision --- Restarts a halted vagrant, and runs all provisioning scripts, including devstack in our case. Please note that this option will likely fail until the Vagrant scripts are updated. vagrant destroy and then vagrant up is the most reliable option right now.
- vagrant destroy --- Deletes the vagrant and all data (be careful!)
- To log into the Vagrant session, use vagrant ssh
- To list the screen sessions available use screen -ls
- To connect to a given screen, screen -x bridge for example (it works as long as the name is an unambiguous subset of one screen session's name)
Pulling Down Latest Demo Code
- Git pull new code from solum-m2demo-ui
Note: This should be all that is needed but in some cases, Django may need to be restarted to pick up the new code. In this case:
- Go to the vagrant directory where Vagrantfile exists
- vagrant ssh
- screen -x bridge
- Control-C to stop Django
- Up arrow and enter to re-run the command (which is: python ./manage.py runserver 0.0.0.0:9001)
- Control-A Control-D to detach
Deleting Applications
Currently, the demo only works with two applications running simultaneously due to port availability. In order to delete old applications without having to perform a full vagrant destroy/up you may:
- Vagrant ssh in and attach to the bridge (described in previous steps, may need to control-C the bridge and restart after these steps)
- solum assembly list
- For each assembly listed, take the UUID and run this command: solum assembly delete [UUID]
- Now clear out the Heat stack by first executing: heat stack list
- For each entry execute: heat stack delete [UUID]