Fuel/Plugins
Contents
What is Pluggable Architecture
Beginning with Mirantis OpenStack 6.0, Fuel features the ability to install plugins along with your environment. Fuel plugins are downloadable software components that enable you to add new capabilities to your environments in a flexible, repeatable and reliable manner. There is no need to install drivers and patches manually after Fuel deploys your cloud – plugins do this for you. Fuel plugins enable you to install and configure additional capabilities for your cloud, such as additional storage types and networking functionality. For example, a Load Balancing as a Service (LBaaS) plugin allows you to add network load balancing functionality to your cloud so that incoming traffic can be spread across multiple nodes. Or you might want to use the GlusterFS plugin so that you can use a Gluster file system as a backend for block storage (Cinder). Fuel offers an open source framework for creating these plugins, so there’s a wide range of capabilities that you can enable Fuel to add to your OpenStack clouds. If you’re a hardware vendor that has created drivers that enable OpenStack to work with your product, you can create a plugin so Fuel can deploy those drivers when it’s standing up new clouds. Or you might simply want to enable OpenStack functionality that’s not readily available in Fuel. Because Fuel includes a pluggable framework, you’re not limited to what’s provided “out of the box”.
How to install Fuel plugins
The plugins are kept in a special Fuel Plugins Catalog, available at Mirantis website.
Limitations
Fuel plugins can only be installed before configuring and deploying the environment. Otherwise, you will have to redeploy the environment to enable the plugin. Please, make sure you read the documentation for the plugins you would like to install and that you are aware of limitations, prerequisites and known issues.
Installation procedure
The installation procedure is the same for all plugins, and consists of 4 easy steps:
- Download the plugin from the Fuel Plugins Catalog and copy it to the Fuel Master node with secure copy (scp).
- Install the plugin with the fuel plugins -- install <plugin name>.fp command.
- Select the plugin checkbox on the Settings tab of the Fuel web UI.
- Finish configuring the environment, click the ‘Deploy’ button and start using the plugin.
How to develop a plugin for Fuel
Planning to create a plugin for Fuel: entry requirements
When planning to write up a plugin for Fuel, mind the following recommendations:
- Use Python.
- Provide deb and rpm packages together with their dependencies.For instructions on creating packages, see Fedora project wiki and Ubuntu Packaging Guide.
- Make up puppet manifests according to the Official OpenStack documentation. For nice code examples and workflow, see Puppet in OpenStack.
- Do not use bash scripts
Preparing an environment for plugin development
Prepare your environment for plugin development in three easy steps:
1. Install the standard Linux development tools.
- For Ubuntu 12.04.2 LTS, run:
sudo apt-get install createrepo rpm dpkg-dev
- For Centos 6.5, run:
yum install createrepo rpm dpkg-devel
2. Install the Fuel Plugin Builder. To do that, you should first get pip:
easy_install pip
3. Then, install Fuel plugin Builder (fpb) itself:
pip install fuel-plugin-builder
Using Fuel Plugin Builder tool
Plugin structure
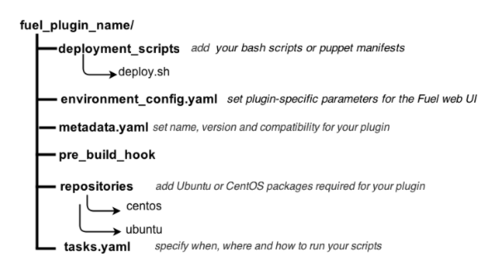
To build your plugin, you should first generate its structure. It looks as follows:
Generating the structure and building the plugin
So, to generate the plugin structure as given above, you should run the following command:
fpb --create <fuel_plugin_name>
As the result, you will only have to build your plugin: fpb --build <fuel_plugin_name>
After your plugin is built, you can see it in your plugin's directory; for example, fuel_plugin_name/fuel_plugin_name-1.0.0.fp
How to use files from plugin structure
tasks.yaml
By default, Fuel Plugin Builder generates two tasks:
- The first one runs a deploy.sh bash script that is located in deployment_scripts directory; this task is applied only on nodes with Controller role.
- The second task creates /tmp/plugin.all file that contains all text; this task is applied to all nodes in the environment.
stage parameter
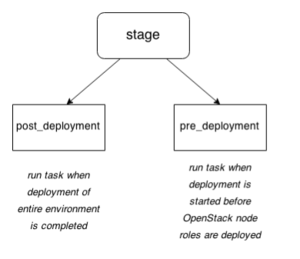
Each task has a "stage" parameter which tells when to run a particular task; "stage" can have either post_deployment or pre_deployment value:
timeout parameter
For each task, you must also specify execution timeout in seconds. Otherwise, the deployment will fail if timeout expires. By default, timeout is set to 300 seconds.
type: shell parameter
Fuel supports two types of plugins, shell and puppet: the first one runs the specified shell command, the second applies Puppet manifests.
Here is the example of shell task:
# This tasks will be applied on controller nodes,
# here you can also specify several roles, for example
# ['cinder', 'compute'] will be applied only on
# cinder and compute nodes
- role: ['controller']
  stage: post_deployment
  type: shell
  parameters:
    cmd: ./deploy.sh
    timeout: 42
# Task is applied for all roles
- role: '*'
  stage: pre_deployment
  type: shell
  parameters:
    cmd: echo all > /tmp/plugin.all
    timeout: 42
type: puppet parameter
Puppet task type allows you to apply your own Puppet manifests on OpenStack nodes. For more information, see Puppet in Fuel section.
To enable this task type, add your site.pp file in deployment_scripts/puppet/manifests/ directory. Then put all required modules in deployment_scripts/puppet/modules directory.
- puppet_manifest - specify directory path for your manifest relative to deployment_scripts.
- puppet_modules - specify directory path for your modules relative to deployment_scripts.
# Deployment will be applied on controllers only
- role: ['controller']
  stage: post_deployment
  type: puppet
  parameters:
    puppet_manifest: puppet/manifests/site.pp
    puppet_modules: puppet/modules
    timeout: 360
type: reboot parameter
Beginning with Fuel 6.1 release, reboot task type allows you to reboot your node with specifying the timeout (by default, it is set to 300 seconds). This can be useful to apply numerous changes at the node.
environment_config.yaml
This file describes additional attributes that will appear on the Settings tab of the Fuel web UI. When the environment is deployed, these attributes are passed to the task executor so that the data is available in the /etc/astute.yaml file on each target node and can be accessed from your bash or puppet scripts.
By default, your environment_config.yaml file adds text field on Fuel web UI:
attributes:
  fuel_plugin_name_text:
    value: 'Set default value'
    label: 'Text field'
    description: 'Description for text field'
    weight: 25
    type: "text"
For more information on Fuel web UI elements for a plugin, see Fuel plugin UI elements.
metadata.yaml
This file contains the description of your plugin:
# Plugin name
name: fuel_plugin_name
# Human-readable name for your plugin, it will be shown on UI
# as a name of plugin group
title: Title for fuel_plugin_name plugin
# Plugin version
version: 1.0.0
# Description
description: Enable to use plugin X
# Required fuel version
fuel_version: ['6.0']
# The plugin is compatible with releases in the list
releases:
  - os: ubuntu
    version: 2014.2-6.0
    mode: ['ha', 'multinode']
    deployment_scripts_path: deployment_scripts/
    repository_path: repositories/ubuntu
  - os: centos
    version: 2014.2-6.0
    mode: ['ha', 'multinode']
    deployment_scripts_path: deployment_scripts/
    repository_path: repositories/centos
# Version of plugin package
package_version: '1.0.0'
| Parameter | Usage | Comments/Example |
|---|---|---|
| name | Example | Example |
| Example | Example | Example |
| Example | Example | Example |
| Example | Example | Example |
| Example | Example | Example |
| Example | Example | Example |
| Example | Example | Example |
| Example | Example | Example |
| Example | Example | Example |
| Example | Example | Example |
| Example | Example | Example |
| Example | Example | Example |
| Example | Example | Example |


