Difference between revisions of "Fuel/Plugins"
Alex Schultz (talk | contribs) m (→Preparing an environment for plugin development) |
(Fpb was released, remove information about installation of development version of fpb) |
||
| Line 430: | Line 430: | ||
In order to migrate from old format to new, follow these steps: | In order to migrate from old format to new, follow these steps: | ||
| − | * Get the latest fuel plugin builder version, 2.0.0 or higher. | + | * Get the latest fuel plugin builder version, 2.0.0 or higher. |
| − | |||
<pre><nowiki> | <pre><nowiki> | ||
| − | + | pip install fuel_plugin_builder | |
| − | |||
| − | |||
</nowiki></pre> | </nowiki></pre> | ||
* Change the value of '''package_version''' parameter in '''metadata.yaml''' file from '''1.0.0''' to '''2.0.0'''. | * Change the value of '''package_version''' parameter in '''metadata.yaml''' file from '''1.0.0''' to '''2.0.0'''. | ||
Revision as of 14:47, 30 April 2015
Contents
- 1 What is Pluggable Architecture
- 2 How to develop a plugin for Fuel
- 3 How to migrate plugins from 1.0.0 to 2.0.0 package version
- 4 How it works from the inside
- 5 Bugs
- 6 Tutorials
- 7 Plugin elements in the Fuel web UI
- 8 Puppet in Fuel
- 9 Creating documentation for Fuel Plugins
- 10 License
- 11 FAQ
- 12 Channels of communication
What is Pluggable Architecture
Beginning with 6.0 version, Fuel features the ability to install plugins along with your environment. Fuel plugins are downloadable software components that enable you to add new capabilities to your environments in a flexible, repeatable and reliable manner. There is no need to install drivers and patches manually after Fuel deploys your cloud – plugins do this for you.
Fuel plugins enable you to install and configure additional capabilities for your cloud, such as additional storage types and networking functionality. For example, a Load Balancing as a Service (LBaaS) plugin allows you to add network load balancing functionality to your cloud so that incoming traffic can be spread across multiple nodes. Or you might want to use the GlusterFS plugin so that you can use a Gluster file system as a backend for block storage (Cinder).
Fuel offers an open source framework for creating these plugins, so there’s a wide range of capabilities that you can enable Fuel to add to your OpenStack clouds. If you’re a hardware vendor that has created drivers that enable OpenStack to work with your product, you can create a plugin so Fuel can deploy those drivers when it’s standing up new clouds. Or you might simply want to enable OpenStack functionality that’s not readily available in Fuel. Because Fuel includes a pluggable framework, you’re not limited to what’s provided “out of the box”.
The plugins are kept in a special Fuel Plugins Catalog.
Note, that Fuel plugins can only be installed before configuring and deploying the environment. Otherwise, you will have to redeploy the environment to enable the plugin. Please, make sure you read the documentation for the plugins you would like to install and that you are aware of limitations, prerequisites and known issues.
How to develop a plugin for Fuel
Planning to create a plugin for Fuel
Entry development requirements
When planning to write up a plugin for Fuel, mind the following recommendations:
- Provide deb and rpm packages together with their dependencies.For instructions on creating packages, see Fedora project wiki and Ubuntu Packaging Guide.
- Make up puppet manifests according to the Official OpenStack documentation. For nice code examples and workflow, see Puppet in OpenStack.
Repo
It is recommended that you created a repo for your plugin inside StackForge project. StackForge is the way that OpenStack related projects can consume and make use of the OpenStack project infrastructure. This includes Gerrit code review, Jenkins continuous integration, GitHub repository mirroring, and various small things like IRC bots, pypi uploads, RTFD updates. Projects should make use of StackForge if they want to run their project with Gerrit code review and have a trunk gated by Jenkins. Your plugin project should look like https://github.com/stackforge/fuel-plugin-<your_plugin_name>.
How to create a project?
1. Make sure you're registered at LaunchPad. If not, see the official OpenStack documentation.
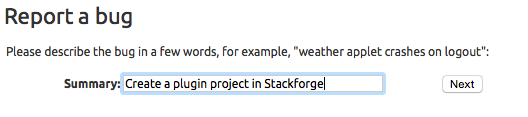
2. Request the repo creation in Fuel project. Enter Fuel project at Launchpad and click Report a bug link.
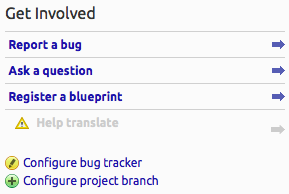

3. In Summary, specify Create a plugin project in Stackforge.

4. Bug description should consist of:
- Plugin name (for example, HA Fencing)
- Plugin functionality overview (for example, enables STONITH-based fencing in HA mode)
- Developer's contact information (email, skype, etc.)
- Core reviewers' contacts (core reviewers have rights to merge changes into the master branch according to Gerrit workflow)
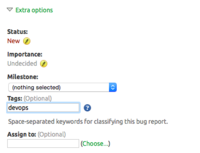
5. Click Extra options. In the menu, specify devops tag.

6. After the repo is created (that means, your bug should be marked as Fix Committed or Fix Released) you can start filling your repo with the following files:
- Plugin itself
- README.md file with a brief description of your plugin, installation and usage instructions
- specs folder with developer’s specification formed according to the template
CI
It's recommended to set up CI for your Fuel plugin. The section below provides summary instructions on CI components and their roles. For information on Continuous Integration in OpenStack, see:
- Understanding the OpenStack CI System
- Setting Up an External OpenStack Testing System – Part 1
- Setting Up an External OpenStack Testing System – Part 2
Tools
Here is the list of key issues, used in terms of Fuel Plugins CI:
| CI | Continuous Integration |
| CD | Continuous Delivery |
| OSTF | OpenStack Testing Framework |
| BVT | Build Verification Tests |
| JJB | Jenkins Job Builder |
| VM | virtual machine |
| Fuel | Fuel |
| Fuel CI | Fuel CI |
| GitHub | GitHub Server |
| Stackforge | Stackforge |
| Gerrit | OpenStack review tool |
As to the tools, the following ones are used:
- GitHub repository with Gerrit code-review tool
- Jenkins CI-server - provides full information about jobs status, scheduler, test results, etc.
- Jenkins Job Builder - tool for easy adding and managing Jenkins jobs. It provides functionality to store jobs’ configuration in a human-readable .yaml markup language and convert them to Jenkins-specific .xml.
Prerequisites
- All plugins in development should have their own CI server. It provides better visioning, collecting test-results, deduplicate the same jobs, easier configuration and managing. They should have identical workflow, build and deployment approaches, tests.
- Each new plugin being under development. should be easily included into existing workflow.
- Stackforge and/or Gerrit repository should be created. See Repo section for more details.
- Jenkins jobs should be under JJB control with required modifications for particular workflow.
- Preferable quantity of test labs should be allocated (plugin-specific).
- Specific Hardware resources should be installed and configured (plugin-specific).
CI/CD Workflow

The particular plugin should go through the following CI pipeline:
- Prepare labs and start or update lab (then new Fuel ISO have built):
- a) Download current ISO from the Fuel CI.Depending on Fuel version, specified in plugin’s requirements Jenkins downloads released ISO(s) and/or currently developed and passed BVT test on core CI.
- b) Deploy this ISO and prepare the required amount of labs for testing using fuel-main repository and running it in console. You can find all the information about VIRTUAL_ENV
and script installation and usage in Fuel development documentation:$ fuel-main/utils/jenkins/system_tests -t test -j dis_fuelweb_test -i (path to downloaded Fuel-ISO) -o --group=setup -V ${VIRTUAL_ENV} -K -k - c) Create/restore from snapshots needed quantity of empty VMs.
The script from the previous list item uses dos.py utility (can be found in fuel-devops repository).
- Gerrit review job will start to build plugin. See Gerrit workflow for more details.
- a) use preconfigured Gerrit Trigger to start your job after new Gerrit Patch arrives
- b) run code syntax checker and unit tests according to the instructions from Testing
- c) run puppet linter (see Puppet OpenStack page for more details)
- d) build plugin (plugin should pass Fuel Plugin Builder requirements)
- e) trigger plugin testing
- Vote on Gerrit patch’s page and add review result in comment using Gerrit Trigger.
- Plugin testing (all three steps are part of system_tests.sh runner from fuel-main repository) :
- a) install a plugin
- b) configure environment
- c) deploy environment with inactive plugin
- d) run OSTF tests.
- Run plugin-specific functional tests to check that current plugin version provides expected functionality.
- Publish resulting aggregated logs to the log storage. You can do it with archiving logs.
Preparing an environment for plugin development
Prepare your environment for plugin development in three easy steps:
1. Install the standard Linux development tools.
- For Ubuntu 12.04.2 LTS, run:
sudo apt-get install createrepo rpm dpkg-dev
- For Centos 6.5, run:
yum install createrepo rpm rpm-build dpkg-devel
2. Install the Fuel Plugin Builder. To do that, you should first get pip:
easy_install pip
3. Then, install Fuel plugin Builder (fpb) itself:
pip install fuel-plugin-builder
Using Fuel Plugin Builder tool
Plugin structure
To build your plugin, you should first generate its structure. It looks as follows:

Generating the structure and building the plugin
So, to generate the plugin structure as given above, you should run the following command:
fpb --create <fuel_plugin_name>
As the result, you will only have to build your plugin: fpb --build <fuel_plugin_name>
After your plugin is built, you can see it in your plugin's directory; for example, fuel_plugin_name/fuel_plugin_name-1.0.0.fp
How to use files from plugin structure
tasks.yaml
By default, Fuel Plugin Builder generates two tasks:
- The first one runs a deploy.sh bash script that is located in deployment_scripts directory; this task is applied only on nodes with Controller role.
- The second task creates /tmp/plugin.all file that contains all text; this task is applied to all nodes in the environment.
stage parameter
Each task has a "stage" parameter which tells when to run a particular task; "stage" can have either post_deployment or pre_deployment value:

timeout parameter
For each task, you must also specify execution timeout in seconds. Otherwise, the deployment will fail if timeout expires. By default, timeout is set to 300 seconds.
Previously, when plugin developer set timeout for operation, this timeout worked differently for specific operations. For example:
- shell task type timeout = timeout * retries (Mcollective retries, 2 by default)
- puppet task type timeout = global timeout (the one set by plugin developer).
Now its works properly in both cases: shell and puppet task types have global timeout.
type: shell parameter
Fuel supports two types of plugins, shell and puppet: the first one runs the specified shell command, the second applies Puppet manifests.
Here is the example of shell task:
# This tasks will be applied on controller nodes,
# here you can also specify several roles, for example
# ['cinder', 'compute'] will be applied only on
# cinder and compute nodes
- role: ['controller']
  stage: post_deployment
  type: shell
  parameters:
    cmd: ./deploy.sh
    timeout: 42
# Task is applied for all roles
- role: '*'
  stage: pre_deployment
  type: shell
  parameters:
    cmd: echo all > /tmp/plugin.all
    timeout: 42
type: puppet parameter
Puppet task type allows you to apply your own Puppet manifests on OpenStack nodes. For more information, see Puppet in Fuel section.
To enable this task type, add your site.pp file in deployment_scripts/puppet/manifests/ directory. Then put all required modules in deployment_scripts/puppet/modules directory.
- puppet_manifest - specify directory path for your manifest relative to deployment_scripts.
- puppet_modules - specify directory path for your modules relative to deployment_scripts.
# Deployment will be applied on controllers only
- role: ['controller']
  stage: post_deployment
  type: puppet
  parameters:
    puppet_manifest: puppet/manifests/site.pp
    puppet_modules: puppet/modules
    timeout: 360
type: reboot parameter
Beginning with Fuel 6.1 release for plugins with package_version: 2.0.0, reboot task type allows you to reboot your node with specifying the timeout. This can be useful to apply numerous changes at the node.
- role: '*'
  stage: pre_deployment
  type: reboot
  parameters:
    timeout: 300
environment_config.yaml
This file describes additional attributes that will appear on the Settings tab of the Fuel web UI. When the environment is deployed, these attributes are passed to the task executor so that the data is available in the /etc/astute.yaml file on each target node and can be accessed from your bash or puppet scripts.
By default, your environment_config.yaml file adds text field on Fuel web UI:
attributes:
  fuel_plugin_name_text:
    value: 'Set default value'
    label: 'Text field'
    description: 'Description for text field'
    weight: 25
    type: "text"
For more information on Fuel web UI elements for a plugin, see Fuel plugin UI elements.
metadata.yaml
This file contains the description of your plugin:
# Plugin name
name: fuel_plugin_name
# Human-readable name for your plugin, it will be shown on UI
# as a name of plugin group
title: Title for fuel_plugin_name plugin
# Plugin version
version: 1.0.0
# Description
description: Enable to use plugin X
# Required fuel version
fuel_version: ['6.0']
# The plugin is compatible with releases in the list
releases:
  - os: ubuntu
    version: 2014.2-6.0
    mode: ['ha', 'multinode']
    deployment_scripts_path: deployment_scripts/
    repository_path: repositories/ubuntu
  - os: centos
    version: 2014.2-6.0
    mode: ['ha', 'multinode']
    deployment_scripts_path: deployment_scripts/
    repository_path: repositories/centos
# Version of plugin package
package_version: '1.0.0'
| Parameter | Usage | Comments/Example |
|---|---|---|
| name | Internal name for your plugin. | Name can consist of lowercase letters, '-' and '_' symbols. |
| title | Human-readable name for the plugin that will appear on the Fuel web UI. | |
| description | Description of your plugin. | For example: Enables X functionality for nodes with Controller role. |
| version | Plugin version. | For the guidelines, see Semantic Versioning 2.0.0. |
| fuel_version | A list of plugin-compatible versions of Fuel. | For example, 2014.2-6.0. |
| package_version | version of plugin; Fuel uses this version to choose the way a plugin should be installed. | Example |
| releases | a list of OpenStack releases compatible with the plugin. | For example, 2014.2-6.0. |
| os | a name of supported Linux distribution | For example, Ubuntu or CentOSe |
| version | A version of OpenStack release | |
| mode | A list plugin-compatible modes. | 'ha' is used if plugin supports High Availability;’'multinode' - if it does not. |
| deployment_scripts_path | A path in your plugin directory where all deployment scripts for the release are located relative to the top of the plugin directory. | |
| repository_path | A path in your plugin directory where all packages for the release are located relative to the top of the plugin directory. | Example |
Plugins deployment order
Beginning with Fuel 6.1 release, you can specify plugins deployment order. This is especially useful if several plugins should be enabled in one environment. For example, plugins for network configuration should be run before plugins the ones installing software services. For each stage name plugin developer adds a postfix, which defines the stage of specific execution order of the task. Let's have a look at the following sample:
The tasks.yaml file of Fuel plugin A:
role: ['primary-controller', 'controller']
      stage: post_deployment/100
      type: shell
      parameters:
        cmd: ./deploy.sh
        timeout: 42
The tasks.yaml file of Fuel plugin B:
 role: ['primary-controller', 'controller']
      stage: post_deployment/50
      type: shell
      parameters:
        cmd: ./deploy.sh
        timeout: 42
During post_deployment stage execution, the task of plugin B
will be run before plugin post task of plugin A, because
post_deployment/50 is lower than post_deployment/100.
Nevertheless, in some cases plugins do not know about each other so the best
way to solve the problem is to define the convention of ranges which
plugin developers will be able to use:
| 0 - 999 | hardware configuration, for example drivers configuration |
| 1000 - 1999 | reserved for future uses |
| 2000 - 2999 | disks partitioning and volumes configuration |
| 3000 - 3999 | reserved for future uses |
| 4000 - 4999 | network configuration |
| 5000 - 5999 | reserved for future uses |
| 6000 - 6999 | software deployment |
| 7000 - 7999 | reserved for future uses |
| 8000 - 8999 | monitoring services deployment |
How the deployment order works in specific cases
- If one network plugin defines stage: post_deployment/100
and another one has stage: post_deployment/2000, they will be installed in the right order without knowing about each other.
- If there are two plugins which implement monitoring, plugin developers
can figure out which plugin should be installed first and tune postfixes accordingly.
- If two tasks have the same priorities, they should be sorted in alphabetical
order by name and the first in the list should be deployed first.
- If several tasks with the same postfix priority are present in a single plugin,
then they should be deployed in the same order in which they specified in the file.
- Postfix can be negative or positive, floating or integer number.
Additional stages
Additional plugin-specific stages can be defined:
- hw_configuration
- disk_partitioning
- network_configuration
- software_installation
With the already existing stages:
- pre_deployment
- post_deployment
And, finally, a new stage:
- monitoring
In this case, plugin developer will be able to work with a single entity without some additional postfixes.
How to migrate plugins from 1.0.0 to 2.0.0 package version
Beginning with Fuel 6.1, new plugins format is supported. Note, that new format is not compatible with Fuel 6.0.
For new plugins, Fuel Plugin Builder builds RPM packages instead of fuel plugin archives.
In order to migrate from old format to new, follow these steps:
- Get the latest fuel plugin builder version, 2.0.0 or higher.
pip install fuel_plugin_builder
- Change the value of package_version parameter in metadata.yaml file from 1.0.0 to 2.0.0.
- Run the following command:
fpb --check plugin_path
and fix the errors one by one or follow the instructions below.
Updates
If your plugin uses "controller" role in tasks.yaml file, make sure that you have also specified the "primary-controller". In new plugins, "controller" and "primary-controller" should be defined explicitly. In previous version, you could indicate "controller", and then the "primary-controller" was added at the backend automatically.
Brand new features
Several obligatory fields are added to metadata.yaml file:
- groups field is used to specify group which your plugin belongs to. Either of the options is available:network, storage, storage::cinder, storage::glance, hypervisor. If your plugin does not belong to any of these options, set an empty list as a value for "groups" parameter.
- authors field provides the list of authors. Here you should specify your or your company's name.
- licenses field contains the list of licenses.
- homepage field sets a link to plugin's project.
One more task type is introduced: the reboot task is useful if you perform node configuration which requires reboot; for example, in case of linux kernel parameters configuration.
For information about reboot task type, see the Plugins wiki.
How it works from the inside
Installation
Installation procedure consists of the following steps:
- User copies fuel_plugin_name-1.0.0. fp file on the Fuel Master node with secure copy.
- Then, after it’s copied to the Fuel Master node, user runs the following command:
fuel plugins --install fuel_plugin_name-1.0.0.fp - Fuel client copies the contents of <fuel_plugin_name-1.0.0>.fp file to the /var/www/nailgun/plugins/fuel_plugin_name-1.0.0.
- Fuel client registers the plugin using REST API Service (Nailgun); it sends a POST request with the contents of metadata.yaml file to /api/v1/plugins url.
Note, that beginning with Fuel 6.1 release, the Fuel Plugin Builder creates rpm packages instead of fp.
See Updates in Fuel 6.1 release.
Configuration
Configuration procedure consists of the following steps:
- When a new environment is created, Nailgun tries to find plugins which are compatible with the environment.
- Nailgun merges the contents of the environment_config.yaml files with the basic attributes of the environment and generates a separate group and the checkbox on the Fuel web UI for each plugin.
- The plugin is disabled until the user enables it. After user selected the plugin checkbox, the Fuel web UI sends the data to Nailgun. Nailgun parses the request and creates relations between Plugin and Cluster models.
Deployment
After environment is created and configured, user starts a deployment. Meanwhile, Nailgun gets the list of enabled plugins from the database. For each plugin from the list, Nailgun parses tasks.yaml file:
- role: ['controller']
  stage: post_deployment
  type: shell
  parameters:
    cmd: ./deploy.sh
    timeout: 42
- role: '*'
  stage: pre_deployment
  type: shell
  parameters:
    cmd: echo all > /tmp/plugin.all
    timeout: 42
For example, we have a two-node environment deployed. A node has a Controller role with UID 7 and Compute role with UID 8. In this case, the task executor generates the following tasks:
{
    "pre_deployment": [
        {
            "uids": ["8", "7"],
            "parameters": {
                "path": "/etc/apt/sources.list.d/fuel_plugin_name-1.0.0.list",
                "data": "deb http://10.20.0.2:8080/plugins/
                fuel_plugin_name-1.0.0/repositories/ubuntu /"
            },
            "priority": 100,
            "fail_on_error": true,
            "type": "upload_file",
            "diagnostic_name": "fuel_plugin_name-1.0.0"
        },
        {
            "uids": ["8", "7"],
            "parameters": {
                "src": "rsync://10.20.0.2:/plugins/fuel_plugin_name-1.0.0/deployment_scripts/",
                "dst": "/etc/fuel/plugins/fuel_plugin_name-1.0.0/"
            },
            "priority": 200,
            "fail_on_error": true,
            "type": "sync",
            "diagnostic_name": "fuel_plugin_name-1.0.0"
        },
        {
            "uids": ["8", "7"],
            "parameters": {
                "cmd": "echo all > /tmp/plugin.all",
                "cwd": "/etc/fuel/plugins/fuel_plugin_name-1.0.0/",
                "timeout": 42
            },
            "priority": 300,
            "fail_on_error": true,
            "type": "shell",
            "diagnostic_name": "fuel_plugin_name-1.0.0"
        }
    ],
    "post_deployment": [
        {
            "uids": ["7"],
            "parameters": {
                "cmd": "./deploy.sh",
                "cwd": "/etc/fuel/plugins/fuel_plugin_name-1.0.0/",
                "timeout": 42
            },
            "priority": 100,
            "fail_on_error": true,
            "type": "shell",
            "diagnostic_name": "fuel_plugin_name-1.0.0"
        }
    ],
    "deployment_info": "<Here is regular deployment info>"
}
| Task | Comment |
|---|---|
| pre_deployment | 1st subtask: Generated automatically by Nailgun. Adds a new repository for the node. Repository's path is built according to the following template: http://{{master_ip}}:8080/plugins/{{plugin_name}}-{{plugin_version}}/{{repository_path}}, where:
2nd subtask: Generated automatically by Nailgun.Using rsync, copies plugin deployment scripts on the target nodes. Path to these files is pretty similar to the repository path. The only difference is that the deployment scripts path is taken from deployment_scripts_path that is placed into metadata.yaml file. 3rd subtask: Initiated by user and taken from tasks.yaml file, converted to task executor format. |
| post_deployment | Has only one task which is taken from tasks.yaml file; uids field contains a list of nodes on which user should run a particular task. In this example, tasks.yaml file has "role: ['controller']" and this role is assigned to controller |
| deployment_info | Contains configuration information, required for deployment and not related to plugins. |
Bugs
Once you have encountered a bug in a specific plugin, plugin development team should quickly learn about that and start creating a fix or workaround.
How to report a bug
- Make sure you're registered at LaunchPad. If not, see the official OpenStack Developer's Guide.
- Report a bug in Launchpad in the Fuel Plugins project: enter https://launchpad.net/fuel-plugins.
- Click Report a bug link:
- Fill in Summary field for a bug. It is going to be the headline. The headline must cointain plugin name (for example, EMC Plugin) in square brackets. Please be descriptive but short and to the point:
- Bad - "<plugin-name> doesn’t install"
- Good - "<plugin name> fails to install in HA mode when “Neutron with VLANs” network is selected"
- Enter “Further information”. This is a bug description. Let's focus on every issue it has:
- Description of the environment. Provide enough relevant information:
- Output of http://fuel-master-node:8000/api/version/
- Operating System
- Reference Architecture (HA / non-HA)
- Network model (Nova-network, Neutron+VLAN, Neutron+GRE, etc.)
- Related Projects installed (Savanna, Murano, Ceilometer)
- Steps to reproduce:
- Bad: Run the deployment in HA configuration
- Good:Install the Fuel Master node. Copy the plugin to the Fuel Master node and install it. Create a new cluster.
- Expected result:
- Good: The plugin is deployed, up and running.
- Actual result:
- Bad: Plugin fails to install.
- Good: Plugin installation fails with the error message “xxx”. Please see the attached screenshot which shows the errors on “Logs” tab.
- Workaround:
- Bad: Don’t use “Neutron with VLANs”
- Good: Apply patch/Change configuration from x to y.
- Impact:
- Bad: Needs to be fixed.
- Good: Deployment cannot be completed, because customer requires us to implement a use case for Savanna and “Neutron with VLANs”. Changing configuration to “Neutron with GRE” is not as acceptable option here so this has to be addressed as soon as possible.
- Select visibility for the bug under “This bug contains information that is” field. Either leave it as “Public” by default.
- Add attachments under “Extra Options” section
- Logs
- Diagnostic snapshot
- Screenshots
- Add <plugin-name> tag.
- After everything is entered, select the “Submit bug report” button.

Tags
For tracking bugs better, please, use different tags:
- every plugin should have its own tag that has <plugin name> format.
- every documentation issue should be marged as docs.
How to create plugin development team in Launchpad
To make the bug tracking process for plugins as simple as possible, plugin developers should create their own teams in Launchpad. Here are the step-by-step instructions:
- Enter Launchpad site.
- Click Register a team link:
- Fill in the fields. You should also provide the following links to the plugin repo, README.md file and Fuel Plugins Catalog:
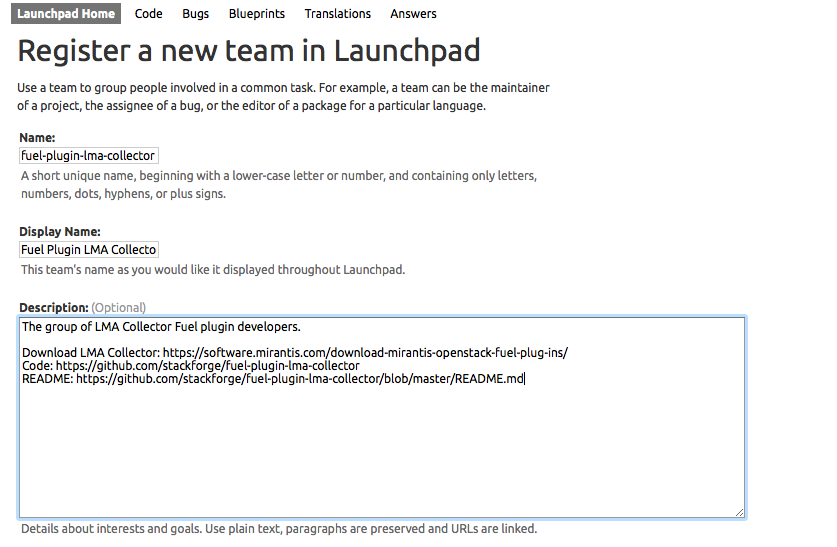
- Select Membership policy:

- Click Create Team button to finish.


For information on adding members and running your team, see the official Launchpad guidelines.
Tutorials
How To: Debug UI
UI elements are described in environment_config.yaml file. To check how your built plugin looks on the Fuel web UI, install and create an environment:
1. Enter plugin directory
cd fuel_plugin_name
2. Edit environment_config.yaml file
3. Build a plugin
fpb --build <plugin_name>
4. Install plugin, use "--force" parameter to replace the plugin if you have it installed:
fuel plugins --install fuel_plugin_name-1.0.0.fp --force
5. Create new environment
fuel env --create --release 1 --name test
6. Check that UI correctly shows elements from environment_config.yaml file
How To: Debug deployment
To show how it works, let's create a simple plugin with an error in deployment script.
1. Create a plugin:
fpb --create fuel_plugin_name
2. Add an error in the default deployment script (fuel_plugin_name/deployment_scripts/deploy.sh):
#!/bin/bash
# It's a script which deploys your plugin
echo fuel_plugin_name > /tmp/fuel_plugin_name
# Non-zero exit code means, that a script executed with error
exit 1
3. If you do not want to run plugin build, but you want to check that plugin format is correct, you can use --check parameter with the following command:
fpb --check fuel_plugin_name
4. Build and install the plugin:
fpb --build fuel_plugin_name/
fuel plugins --install fuel_plugin_name/fuel_plugin_name-1.0.0.fp
5. Use the Fuel web UI or CLI to create an environment:
fuel env create --name test --rel 1 --mode multinode --network-mode nova
6. Enable the plugin on Fuel web UI Settings tab and then add several nodes. The first node has Controller role, the second node has Cinder and Computes roles.
fuel node set --node 1 --env 1 --role controller
fuel node set --node 2 --env 1 --role compute,cinder
7. Check that Nailgun generates correct configuration data that a user can set on Fuel web UI:
fuel deployment --default --env 1
 cat deployment_1/controller_1.yaml
 ...
 fuel_plugin_name:
   fuel_plugin_name_text: Set default value
...
8. Now can see that the file for target node contains plugin data.
NOTE:
The command mentioned above is useful when you do not know how your configuration data from Fuel web UI Settings tab will look like in /etc/astute.yaml file on target nodes.
9. Perform provisioning without deployment for two nodes:
fuel --env 1 node --provision --node 1,2
NOTE:
To reduce the time required for testing, make a snapshot after nodes are provisioned. Note that if you use virtual machines, make snapshots of your target nodes.
10. Now you can run deployment:
fuel --env 1 node --deploy --node 1,2
11. The deployment fails with the following message:
Deployment has failed. Method deploy. Failed to deploy plugin fuel_plugin_name-1.0.0
12. You can see an error in /var/log/docker-logs/astute/astute.log task executor logs:
[394] Shell command failed. Check debug output for details
[394] 13edd324-6a11-4342-bc04-66c659e75e35: cmd: ./deploy.sh
cwd: /etc/fuel/plugins/fuel_plugin_name-1.0.0/
stdout:
stderr:
exit code: 1
13. It fails due to the changes in deploy.sh script that you made in step 2. Let's assume that we do not know what happened and try to debug the problem:
# Go to the first node
ssh node-1
14. All plugin deployment scripts are copied to the separate directory on the target node; in this case, it is /etc/fuel/plugins/fuel_plugin_name-1.0.0/:
cd /etc/fuel/plugins/fuel_plugin_name-1.0.0/
# The directory contains our deploy.sh script, lets run it
./deploy.sh
# And check exit code
echo $? # Returns 1
NOTE:
If you use puppet for your plugin deployment, run the following command on the target node to check if your puppet manifests work correctly:

puppet apply --debug --modulepath=/etc/fuel/plugins/fuel_plugin_name-1.0.0/modules /etc/fuel/plugins/fuel_plugin_name-1.0.0/manifests/site.pp
15. Now we can see that deployment fails due to non-zero exit code error. To fix the problem and check that the proposed solution works, edit the /var/www/nailgun/plugins/fuel_plugin_name-1.0.0/deployment_scripts/deploy.sh script on the Fuel Master node. Note that there is no need to rebuild and reinstall a plugin:
#!/bin/bash

# It's a script which deploys your plugin
echo fuel_plugin_name > /tmp/fuel_plugin_name

# Now our deployment script returns 0 instead of 1
exit 0
16. If you run the deployment again, it goes successfully:
fuel --env 1 node --deploy --node 1,2
WARNING:
During the testing of your deployment scripts, make sure that your scripts are idempotent: they should work correctly when applied several times. Run environment deployment at least twice and check that your plugin works properly. The reason for this workflow is the following: Fuel can run deployment of your plugin several times in case the first deployment try failed. Also, your deployment scripts can be executed during OpenStack patching.
17. To make sure that plugin works without errors, revert snapshots which you made in step 6, and run deployment again:
fuel --env 1 node --deploy --node 1,2
18. In the same way with no plugin reinstallation, you can edit /var/www/nailgun/plugins/<fuel_plugin_name>-1.0.0/tasks.yaml file. Note that in this case to make sure that your tasks have a valid format, you should at least run the following command:
fpb --check /var/www/nailgun/plugins/fuel_plugin_name-1.0.0/
Plugin elements in the Fuel web UI
Here is an example of the environment_config.yaml file that contains all possible Fuel web UI elements:
attributes:

  # Text field
  fuel_plugin_name_text:
    type: "text"
    weight: 10
    value: "Default text"
    label: "Text field label"
    description: "Field description"
    regex:
      source: '\S'
      error: "Error field cannot be empty"

  # Dropdown
  fuel_plugin_name_dropdown:
    type: "dropdown"
    weight: 20
    value: "value2"
    label: "Dropdown label"
    description: "Dropdown description"
    values:
      - data: "value1"
        label: "Value 1 label"
      - data: "value2"
        label: "Value 2 label"
      - data: "value3"
        label: "Value 3 label"

  # Checkbox
  fuel_plugin_name_checkbox:
    type: "checkbox"
    weight: 30
    value: false
    label: "Checkbox label"
    description: "Checkbox description"

  # Radio button
  fuel_plugin_name_radio:
    type: "radio"
    weight: 40
    value: "disabled"
    label: "Radio buttons label"
    values:
      - data: "data1"
        label: "Label data1"
        description: "Description data1"
      - data: "data2"
        label: "Label data2"
        description: "Description data2"
      - data: "data3"
        label: "Label data3"
        description: "Description data3"
After plugin is installed, additional elements appear on the Settings tab of the Fuel web UI:

Puppet in Fuel
Fuel does not use master Puppet. Task executor copies manifest from the Fuel Master node and runs puppet apply command on each target node. It is recommended that you use puppet tasks in your plugin instead of running puppet in shell tasks. Task executor has code with special logic which handles errors, if puppet apply command returns zero/non-zero exit code. Note that it does not mean that command is succeed or failed. That means, it returns '2' if there were changes during the execution: task executor parses /var/lib/puppet/state/last_run_summary.yaml file to determine the status of puppet run.
Creating documentation for Fuel Plugins
Fuel Plugins can provide brand different functionality, that's why you should not only develop a plugin itself, but also write documentation clear to end users.
Documentation package
When certifying the plugin, you need to provide the following documents:
- Test Plan - contains information on planned testing activities
- Test Report - contains information obtained during testing
- Plugin Guide - cointans installation, configuration and usage instructions.
Using Fuel Plugins Catalog, you can download not only the plugin file, but also Plugin Guide.
All documents from the list are formed according to the templates. When writing, take style recommendations in consideration.
Style recommendations
- Spell out acronyms and abbreviations when they are first used and avoid using abbreviations that are ambiguous. For example, "OS" could mean either "Operating System" or "OpenStack".
- Do not add many links to external resources in main sections. It is recommended that you put them into Appendix section.
- Each link should have a brief description.Be sure to define any complex concepts and terms that are required to install/use/test the plugin.
- Use step-by-step instructions, structured with an introductory sentence followed by a numbered list of steps to take.
Note, that they should also meet acceptance criteria to pass the certification successfully.
Acceptance criteria
Plugin Guide
Plugin Guide should meet the following acceptance criteria:
- the Guide is written according to the given template
- the plugin version is the one reflected in the plugin's metadata.yaml file
- the Guide contains 2 main parts: Installation Guide and User Guide
- the Installation Guide has the following issues covered: 1) how/where to download a plugin 2) how to install a plugin 3) any additional prerequisite procedures (e.g. backend configuration)
- the User Guide has the following issues covered: how to use the plugin (e.g. a set of commands) with an example (commands usage with specific values is strongly required)
- all links to external documentation/resources should be present in the Guide
- an intro section explains the functionality the plugin provides in a detailed and clear manner
- all complex concepts are explained in a detailed and clear manner
- if plugin has its own UI or supposes some actions to take in Horizon, the User Guide must have screenshots with clearly seen UI elements and the instructions provided
the User Guide must have properly cropped screenshots
- the User Guide should contain specific tasks to accomplish in a form of how-to step-by-step manual
- the Guide must be targeted not only at experienced admins/operators, but also at people new to Mirantis OpenStack. That means paying extra attention to items 5-8 covered above.
Documentation versioning
Each document contains Revision History table:
| Version | Date | Editor | Comment |
|---|---|---|---|
| 0.1 | 04.14.2015 | <name> <email> | Created the document. |
| 0.2 | 04.16.2015 | <name><email> | Added <section name> section. |
| 1.0 | 04.17.2015 | <name><email> | Major version. |
Note, that when you send documents for certification, they must have 1.0 version with Major version comment as the last entry in the Revision History table.
Checklist
| Issue | Tick if done |
|---|---|
| Plugin version is the one specified in the plugin's metadata.yaml file (see the example). | |
| All key terms/acronyms/abbreviations are put into the corresponding table and clearly explained or at least refer to other resources with detailed description. | |
| Plugin name doesn't somehow change within the document (like VPNaaS and vpnaas). Stick to one variant and use it along the text. | |
| If configuration of specific components (if any) is not covered within the document, then there must be a link pointing to the detailed step-by-step instructions. | |
| All UI elements are properly seen in the screenshots and or even highlighted to point at a specific action/element. | |
| All instructions are put into numbered lists to track the task accomplishment and navigate along the document. | |
| All instructions concerning Fuel UI wizard or Fuel web UI refer to the official documentation. |
License
Fuel Plugins are licensed under Apache 2.0.
Note, that the plugin's repo should also contain this license as a separate file (for example, see VPNaaS repo) and copyright.
FAQ
Where can I find Fuel Plugin Builder source code?
fuel-plugin-builder is located in fuel-plugins repository.
Are there any plugins examples?
All plugins for Fuel now have their own repos under Stackforge project.
How can I reuse Puppet modules from Fuel? According to the design, every plugin should have all necessary components to be then deployed. This means, every plugin should have its own copy of Fuel Puppet modules. If you do not want to keep copy of Fuel library manifests in your repository, you can use pre_build_hook to download the required modules during the plugin build. To do that, add the following code into your hook:
#!/bin/bash
set -eux
ROOT="$(dirname `readlink -f $0`)"
MODULES="${ROOT}"/deployment_scripts/puppet/modules
mkdir -p "${MODULES}"
REPO_PATH='https://github.com/stackforge/fuel-library/tarball/f43d885914d74fbd062096763222f350f47480e1'
RPM_REPO="${ROOT}"/repositories/centos/
DEB_REPO="${ROOT}"/repositories/ubuntu/

wget -qO- "${REPO_PATH}" | \
    tar -C "${MODULES}" --strip-components=3 -zxvf - \
    stackforge-fuel-library-f43d885/deployment/puppet/{inifile,stdlib}
The code then copies inifile and stdlib modules from fuel-library repository.
WARNING
To reuse existing Puppet manifests you can also specify several Puppet modules in your task with colon separator: for example, puppet_modules: "puppet/modules:/etc/puppet/modules". Note that we do not recommend using this approach, because Fuel puppet modules can be changed during OpenStack update procedure; this can lead to compatibility failures.
How can I download the packages which are required for a plugin? Use wget in your pre_build_hook script to download packages in the required directories:
#!/bin/bash
set -eux

ROOT="$(dirname `readlink -f $0`)"
RPM_REPO="${ROOT}"/repositories/centos/
DEB_REPO="${ROOT}"/repositories/ubuntu/

wget -P "${RPM_REPO}" http://mirror.fuel-infra.org/fuel-plugins/6.0/centos/glusterfs-3.5.2-1.mira2.x86_64.rpm
wget -P "${DEB_REPO}" http://mirror.fuel-infra.org/fuel-plugins/6.0/ubuntu/glusterfs-client_3.5.2-4_amd64.deb
It downloads two packages in your plugin's directories before Fuel Plugin Builder starts building repositories.
Why is there no /etc/astute.yaml file, when I run pre_deployment task?
If you have task with "stage: pre_deployment" parameter set, you will not find /etc/astute.yaml file on the target node during the task execution. The file /etc/astute.yaml is a symlink that is created before Fuel deploys a role.
Target node can have several roles and each role contains its own file with deployment data.
Here is the example of a node with ID 2 and two roles, Controller and Cinder:
root@node-2:~# ls -l /etc/ | grep yaml
-rw------- 1 root     root      8712 Nov 19 12:48 controller.yaml
-rw------- 1 root     root      8700 Nov 19 12:48 cinder.yaml
Let's assume that we need deployment data file for Controller role. We can use '/etc/controller.yaml' file directly in deployment script.
What is the user context that fuel plugin hooks are invoked as: root or fuel user? Plugins hooks are executed under the root.
Are the keystone IP addresses and user name or password available to the fuel plugin post_deployment hook? Keystone admin_token, admin_password are in /etc/astute.yaml and can be used in the post_deployment hook. For connection to keystone we should use management_vip:5000. management_vip is also in the astute.yaml. Also keystone url can be fetched from /root/openrc (OS_AUTH_URL), but this is hackish way.
Do multiple openstack controller nodes mean multiple neutronserver nodes?Neutron server is installed on each controller node. Are all the controller nodes' private IP (not VIP) available and accessible to the postdeployment hook?(because we want to run the avicontroller, network etconly once, but we have to run the plugin install on all neutronserver nodes)? Since there are multiple controller nodes, then fuel infrastructure automatically runs the plugin postdeployment hook on each of them.
The private IP is referred to the IP of VM, or what we call management IP - all people in OpenStack name it differently. On the post_deployment step all networks, controllers, e.t.c. are configured and run.
In pre-deployment, the astute.yaml is a symlink to the role specific yaml (controller, cinder etc) before the role is deployed, but in post-deployment how is astute.yaml organized - merged from all role yamls? The astute.yaml files are not merged during deployment process. Result file just astute.yaml for last deployed role. Specific astute.yaml can be found by role name.
How can I add a custom role? Current Plugin Architecture does not provide a way to define role. Starting with Fuel 6.1 you can use the Operating System role as a workaround.
In the tasks.yaml file use the base-os string to specify which task should be used for the role deployment.
- role: ['base-os']
  stage: post_deployment
  type: shell
  parameters:
    cmd: ./deploy.sh
    timeout: 42
When creating documentation for your plugin, ask the user to assign the Operating System role on the required node and specify the name to give this node, such as zabbix-01. In the deployment script you can query the user_node_name variable and decide if the script should deploy Zabbix related packages on the node.
...
user_node_name: zabbix-01
...
Channels of communication
If you have some questions left, feel free to use the following channels:
- #fuel-dev IRC channel at Freenode
- openstack-dev mailing list (use [fuel][plugin] prefix)