Neutron/Metering/Bandwidth
Contents
Overview
The idea is to meter this at the L3 routers levels. The point is to allow operators to configure IP ranges and to assign a label to them. For example we will be able to set two labels; one for the internal traffic, and the other one for the external traffic. Each label will measure the traffic for a specific set of ip range. Then, bandwidth measurement will be send for each label to the Oslo notification system and could be collected by Ceilometer.
Blueprints
https://blueprints.launchpad.net/neutron/+spec/bandwidth-router-label
https://blueprints.launchpad.net/neutron/+spec/bandwidth-router-measurement
https://blueprints.launchpad.net/ceilometer/+spec/ceilometer-quantum-bw-metering
Implementation overview
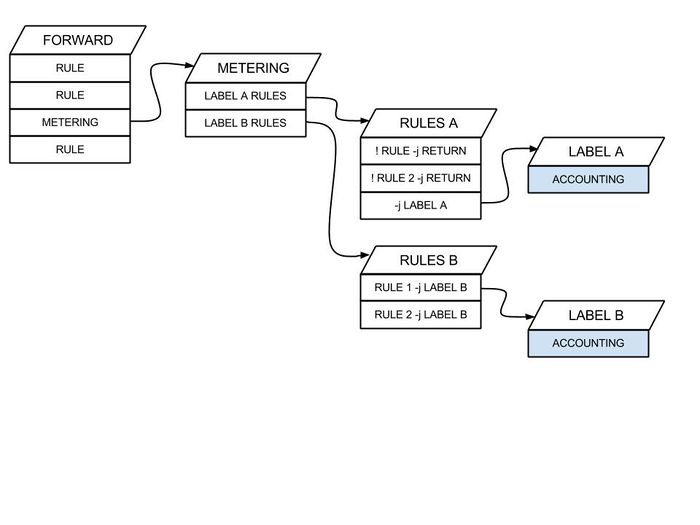
The metering of the bandwidth can be realized by set up some IPtables rules on each l3 namespaces.
- Add a global rule for the metering on the FORWARD chain of each router.
- Add rules to the metering chain for each traffic that we want to measure.
- These rules will point to a specific chain used to collect the traffic (packets, bytes). This chain will represent the metering label.
- Add an agent to get the bandwidth information from IPtables chain. This agent will populate bandwidth usage informations as delta with the Oslo notifications mechanism.
Technical implementation
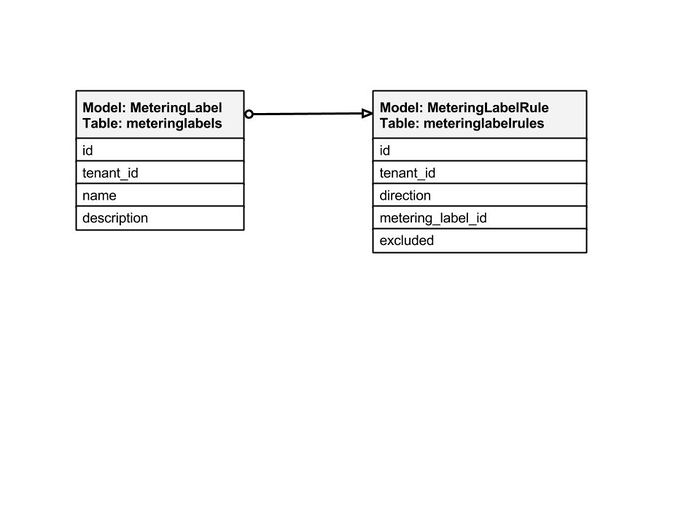
Data Model
Iptables Chain Model
Notification format
{
   'first_update':1377529521,
   'bytes':14616,
   'host':'Metering1',
   'last_update':1377529545,
   'label_id':u'740fa929-974a-4e84-81ec-ce801c09814c',
   'time':24,
   'pkts':174
}
| Key | Value format | Notes |
|---|---|---|
| first_update | integer | Timestamp of the first measure |
| bytes | integer | Bytes measured between two measure_interval(see config) |
| host | string | Hostname of the agent |
| last_update | integer | Timestamp of the last measure |
| label_id | uuid-str | UUID of the label |
| time | integer | Time elapsed during the last and the current measure |
| pkts | integer | Packets measured between two measure_interval(see config) |
Implementation plan
The implementation of this extension follow the next plan:
- Implementation of the metering service plugin
- Implementation of the metering agent
- Implementation of a first metering driver based on IPTables
- Database model and API modifications
- Add metering agent notification at the router creation
- Add new command to CLI
CLI
Commands introduced into python-neutronclient :
 meter-label-create             Create a metering label for a given tenant.
 meter-label-delete             Delete a given metering label.
 meter-label-list               List metering labels that belong to a given tenant.
 meter-label-show               Show information of a given metering label.
 meter-label-rule-create        Create a metering label rule for a given label.
 meter-label-rule-delete        Delete a given metering label.
 meter-label-rule-list          List metering labels that belong to a given label.
 meter-label-rule-show          Show information of a given metering label rule.
Examples
Creation of a metering label :
# neutron meter-label-create NAME
Creation of a metering label for a specific tenant:
# neutron meter-label-create --tenant-id TENANT-ID NAME
Add some rules to this label :
# neutron meter-label-rule-create METERING_LABEL_ID REMOTE_IP_PREFIX --direction egress --excluded
Authorization
Only admin user will be authorized to manipulate the metering labels/rules.
Plugin Support
This extension will be implemented as a service plugin.
Reviews
- https://review.openstack.org/#/c/33075/
- https://review.openstack.org/#/c/35655/
- https://review.openstack.org/#/c/36813/
- https://review.openstack.org/#/c/33611/
How to Test (Draft)
Add the metering plugin to neutron.conf
[DEFAULT]
service_plugins = neutron.services.metering.metering_plugin.MeteringPlugin
Restart neutron-server...
Edit /etc/neutron/metering_agent.ini
[DEFAULT]
# Show debugging output in log (sets DEBUG log level output)
debug = True

driver = neutron.services.metering.drivers.iptables.iptables_driver.IptablesMeteringDriver

# Interval between two metering measures
measure_interval = 30

# Interval between two metering reports
report_interval = 300

interface_driver = neutron.agent.linux.interface.OVSInterfaceDriver

use_namespaces = True
Start metering agent on each L3 Agent hosts
neutron-metering-agent --config-file /etc/neutron/neutron.conf --config-file /etc/neutron/metering_agent.ini
Devstack Setup
Add the following lines to your localrc:
ENABLED_SERVICES+=,q-metering
Then run stack.sh
After stack.sh completes you'll be able to manage your meter labels and rules via the CLI tools